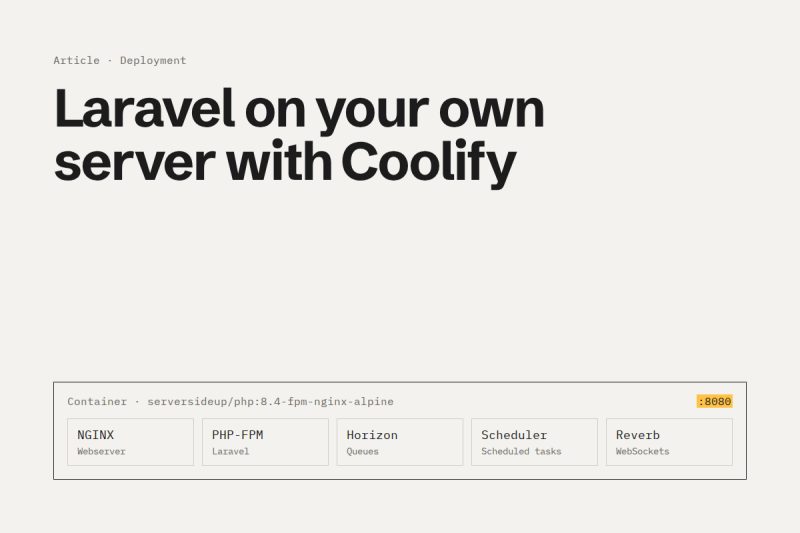
In this article, I'll show you how to deploy your Laravel application on your own Coolify instance, including the queue worker, scheduler and Reverb. I'm assuming you've already set up your Coolify instance.
Table of contents
- My setup
- Creating the Dockerfile
- Setting up Laravel services (e.g. Horizon, Scheduler, Reverb) (optional)
- Connecting GitHub / GitLab
- Creating the project and environments
- Setting up the database & Redis
- Creating the Laravel application
- Adding a domain
- Troubleshooting / debugging
1. My setup
For this article, I'm using the following versions. Coolify's interface may change in the future, or Laravel may require adjustments. Please check this yourself beforehand.
- Laravel: 13
- PHP: 8.4
- Coolify: 4.6.0
- Base image from Server Side Up:
serversideup/php:8.4-fpm-nginx-alpine(version 5) - Yarn: 1.22.22
2. Creating the Dockerfile
We're working with a Dockerfile that we place in the root directory of our project.
As a base, I'm using the image from Server Side Up, specifically the fpm-nginx variant. It contains PHP-FPM and NGINX in a single container, both managed by S6 Overlay. The application is available on port 8080. Important: the plain fpm variant doesn't include a web server and won't work for this setup.
Feel free to use my Dockerfile and adapt it to your needs:
FROM node:22-alpine AS frontend
WORKDIR /app

COPY package.json yarn.lock ./

RUN --mount=type=cache,target=/usr/local/share/.cache/yarn \
    yarn install --frozen-lockfile --non-interactive

COPY . .
RUN yarn build


FROM composer:2 AS composer_bin


FROM serversideup/php:8.4-fpm-nginx-alpine AS php_base

# Optional: adjust the PHP memory limit
ENV PHP_MEMORY_LIMIT=512M

# On container start: storage:link, migrate --force and optimize
ENV AUTORUN_ENABLED=true

# Laravel health check, used by Coolify for rolling updates, for example
ENV HEALTHCHECK_PATH=/up

USER root

RUN install-php-extensions bcmath gd intl

USER www-data


FROM php_base AS vendor

# The build stage runs as root so Composer can write to /app
USER root
WORKDIR /app

COPY --from=composer_bin /usr/bin/composer /usr/local/bin/composer

COPY composer.json composer.lock ./

RUN --mount=type=cache,target=/tmp/cache \
    composer install \
      --prefer-dist \
      --no-dev \
      --no-interaction \
      --no-scripts \
      --no-progress

COPY . .

RUN composer dump-autoload --optimize --no-scripts


FROM php_base AS app

WORKDIR /var/www/html

USER root

COPY . .
COPY --from=vendor /app/vendor ./vendor
COPY --from=frontend /app/public/build ./public/build

RUN mkdir -p storage/logs bootstrap/cache \
    && chown -R www-data:www-data storage bootstrap/cache

# Laravel services from section 3 (optional)
COPY --chmod=755 ./docker/s6/ /etc/s6-overlay/s6-rc.d/
RUN touch /etc/s6-overlay/user-bundles.d/user/contents.d/laravel-horizon \
    && touch /etc/s6-overlay/user-bundles.d/user/contents.d/laravel-scheduler

USER www-data
A few notes:
- No custom
CMD: The image starts NGINX and PHP-FPM itself through S6 Overlay. A customCMDwould bypass that. - Skipped section 3? Then remove the last two
COPYandRUNinstructions for the services. - Frontend build with packages from
vendor: If your frontend imports packages like Ziggy directly from thevendorfolder,yarn buildwill fail in the Node stage because there's novendorfolder there yet. In that case, you need to copy thevendorfolder into the frontend stage before the build. - Automatic Laravel commands: With
AUTORUN_ENABLED=true, the image automatically runs the most important Laravel commands when the container starts, including database migrations,storage:linkandoptimize. So you don't have to add them as deployment commands yourself. Since this happens when the new container starts, the database is already up to date before the new container takes over the traffic. - Health check:
HEALTHCHECK_PATH=/upuses the/uproute that Laravel ships with by default. This is how Coolify knows whether the new container is ready before switching the traffic over.
I also recommend adding a .dockerignore to your repository:
.git
.github
.idea
.vscode
.env
.env.*
!.env.example
node_modules
vendor
public/build
bootstrap/ssr
public/hot
public/storage
storage/app/*
!storage/app/.gitignore
!storage/app/public
storage/app/public/*
!storage/app/public/.gitignore
storage/logs/*
storage/framework/cache/*
storage/framework/sessions/*
storage/framework/testing/*
storage/framework/views/*
bootstrap/cache/*.php
tests
docs
*.log
Add both files to your repository.
3. Setting up Laravel services
If you want to use services like Horizon, the scheduler or Reverb, that's no problem. We'll set them up as S6 services. That way, they run in the same container as the application and are restarted automatically if they crash.
3.1 Creating the folder structure
Create a docker folder in your repository, and inside it another folder called s6. Each service gets its own subfolder there. You can name the subfolder however you like, but the name has to match the one in the Dockerfile. In this article, I'm using laravel-horizon, laravel-scheduler and laravel-reverb.
In the end, the structure looks like this:
.
├── app
├── bootstrap
├── ...
├── docker
│   └── s6
│       ├── laravel-horizon
│       │   ├── dependencies.d
│       │   │   └── base
│       │   ├── run
│       │   └── type
│       └── laravel-scheduler
│           ├── dependencies.d
│           │   └── base
│           ├── run
│           └── type
├── ...
└── Dockerfile
Each service consists of three files:
rundefines which process should be started.typedefines what kind of service it is.dependencies.d/baseis an empty file. It makes sure the service only starts once the container's base initialization has finished. This helps you avoid problems during startup.
3.2 Queue worker / Horizon
In the docker/s6/laravel-horizon folder, create a file called run without a file extension. For a simple queue worker:
#!/command/with-contenv sh
cd /var/www/html
exec php artisan queue:work --sleep=3 --tries=3 --max-time=3600
Or, if you're using Horizon:
#!/command/with-contenv sh
cd /var/www/html
exec php artisan horizon
Then the type file:
longrunAnd finally, the empty file dependencies.d/base.
3.3 Scheduler
For the scheduler, create the docker/s6/laravel-scheduler folder with the same three files. The run file:
#!/command/with-contenv sh
cd /var/www/html
exec php artisan schedule:work
The type file:
longrunAnd again, the empty file dependencies.d/base.
Important for rolling updates: During a deployment, Coolify briefly runs the old and the new container at the same time, which means two schedulers. To prevent scheduled tasks from running twice, add
->onOneServer()to them. This requires a shared cache, such as Redis.
3.4 Reverb
You set up Reverb the same way, in the docker/s6/laravel-reverb folder. Only the command in run changes:
#!/command/with-contenv sh
cd /var/www/html
exec php artisan reverb:start --host=0.0.0.0 --port=8000
The type file:
longrunAnd here too, the empty file dependencies.d/base. Also add another line to the Dockerfile so the service gets started:
RUN touch /etc/s6-overlay/user-bundles.d/user/contents.d/laravel-reverbTwo things are important with Reverb:
- The port: By default, Reverb uses port
8080. In this image, however, that port is already taken by NGINX. That's why we start Reverb on port8000. - Reachability: For the WebSocket to be reachable from outside, Reverb needs its own domain or subdomain in Coolify, pointing to port
8000. More on that in section 8.
Note for older image versions: In versions before 5, the directory for services that are started on boot is still located at
/etc/s6-overlay/s6-rc.d/user/contents.d/. So check which version your image uses and adjust the path in the Dockerfile accordingly.
Commit and push all files to your repository.
4. Connecting GitHub / GitLab
To let Coolify access your repository and deploy automatically on every push, we connect it to GitHub or GitLab through an app. I'll show you both ways. Besides GitHub and GitLab, Coolify also offers an app for Gitea, by the way.
4.1 GitHub
- In Coolify, navigate to Sources and click New Source.

- Select GitHub App and click Continue.
- Enter a name and select an organization if needed. If you run your own GitHub instance, enter its details under "Self-hosted / Enterprise GitHub".

- Click Register with GitHub. Coolify then opens GitHub, where you confirm the new app.
- GitHub then redirects you to install the app. This is where you decide which repositories Coolify can access: either all or only selected ones.
Watch out with selected repositories: If you later want to deploy a new repository with Coolify, you need to grant the app access to it first. Otherwise, Coolify can't access it. You can do this in GitHub under Settings → Applications, where you can edit the installed app and add more repositories.
4.2 GitLab
With GitLab, you create the application in GitLab yourself and then transfer the credentials to Coolify.
- In Coolify, navigate to Sources, click New Source and select GitLab App.
- Enter a name. If you run your own GitLab instance, also enter its URL.
- Coolify now shows you the Redirect URL and the required scopes. Keep this page open.

- Log in to GitLab or your own GitLab instance and open the Applications section in your profile.
- Create a new application there, enter the redirect URL from Coolify and enable these scopes:
apiread_userread_repository
- After saving, GitLab shows you the Application ID and the Application Secret.
- Enter both values in Coolify and save.
Tip: GitLab usually only shows the full Application Secret right after the application is created. So copy it to Coolify straight away.
4.3 Testing the connection
For every app you create, you can test the connection directly in Coolify. Coolify then shows you the current status. If it says Connected, everything is set up. Otherwise, you'll get an error message that gives you a hint about the cause, such as a wrong redirect URL or missing scopes.

4.4 Automatic deployments with GitLab
With GitHub, the app automatically creates a webhook in your repositories. That's why Coolify starts a deployment on its own whenever you push to the configured branch.
With GitLab, that's not the case. Here, you need to create the webhook for each repository individually. Otherwise, nothing happens when you push.
- In Coolify, outside of any project, navigate to Integrations → Sources and open your GitLab source.
- Near the top, you'll find the Webhook section with a Webhook URL and a Webhook Secret Token. You'll need both in a moment.
- In GitLab, open your repository and go to Settings → Webhooks.
- Enter the URL from Coolify and set the Secret Token.
- Under triggers, check Push events. Optionally, you can restrict the branches, either with a wildcard pattern or a regular expression. By default, the trigger applies to all branches.
- Leave Enable SSL verification enabled. Your Coolify instance should be reachable via SSL anyway, so this won't cause any problems.
- Click Add webhook.
Tip: Once it's created, you can test the webhook directly in GitLab via Test → Push events. In the list of recent events, you can then see whether Coolify accepted the request successfully.
5. Creating the project and environments
First, we create a new project in Coolify. Give it a name that makes the project easy to identify. A description is optional.
Coolify automatically creates an environment called Production for every new project. You can edit the name and description of this environment at any time.
Most of the time, you'll need more than one environment, for example an additional one for testing. To add one, click on the list of environments in your project and create another one under New Environment. Again, you can choose any name you like.

6. Setting up the database & Redis
Before we create the Laravel application itself, we set up the services it needs: the database, Redis and possibly other services such as Meilisearch.
6.1 MySQL
- Open the environment you want and click New Resource.
- Search for the service you need. Among others, Coolify offers MySQL, MariaDB and phpMyAdmin.
- Select the service and choose the server it should run on.
- Adjust the settings. For MySQL, these are:
- name of the service
- image or version
- root password
- name and password of the normal user
- name of the initial database
- port mapping (see below)
- optionally, a custom MySQL configuration
- Click Deploy.

Access with your database tool
To connect to the database later with a tool like TablePlus or DBeaver, set the port mapping to:
127.0.0.1:3306:3306This makes the database reachable only on the server itself, not from the internet. In your database tool, you then connect to the server via SSH and use 127.0.0.1 as the database host.
Important: Don't leave out the
127.0.0.1at the beginning. A mapping like3306:3306makes the database reachable on all of the server's network interfaces. Docker bypasses common firewall rules in the process, such as those from UFW, so the database can end up openly accessible on the internet despite your firewall.
Multiple databases on one server: Each port can only be used once on the server. If you have a separate database for staging and production, for example, and want to connect to both, each one needs its own port before the colon, such as
127.0.0.1:3306:3306for production and127.0.0.1:3307:3306for staging. The port after the colon stays the same, since that's the port inside the container. In your database tool, you then use the respective port before the colon. The same applies if you run a mix of MySQL, MariaDB and PostgreSQL.
Publicly accessible database
Coolify also offers the option to make a service publicly available through a public port. You don't need this for normal operation. With the port mapping above, you can reach your database without a public port.
Finding the host for Laravel
Coolify generates an internal connection URL for every service. That's the only place where you'll find the internal host your Laravel application uses to reach the database. The URL looks something like this:
mysql://mysql:<password>@cp1jskyerlcgvflqplyccl55:3306/defaultThe host is between the @ and the following :, so in this example it's cp1jskyerlcgvflqplyccl55. This gives you the values for your Laravel application:
DB_CONNECTION=mysql
DB_HOST=cp1jskyerlcgvflqplyccl55
DB_PORT=3306
DB_DATABASE=default
DB_USERNAME=mysql
DB_PASSWORD=<password>
6.2 Redis
You create Redis the same way as the database: search for Redis under New Resource and click Deploy.
Here too, you can adjust the name and image and optionally set a username. Coolify shows you the password directly. The internal URL is structured the same way as for MySQL, so the host is again between the @ and the following :.
REDIS_HOST=<host-from-the-internal-url>
REDIS_PASSWORD=<password>
REDIS_PORT=6379
You don't need a port mapping for Redis unless you also want to connect to Redis from your own machine. In that case, proceed the same way as with MySQL, just with port 6379.
7. Creating the Laravel application
Now we create the actual application.
7.1 Selecting the repository
- Click New Resource in your environment.
- Under the suggested applications, select Git Repository (with GitHub App) or Git Repository (with GitLab App).

- Select the app you created in section 4.
- Select the repository. You'll see all repositories that Coolify has access to.
Coolify then loads the repository automatically and checks whether there's a Dockerfile, which port it exposes and whether there's a .env.example.
7.2 Configuring the build
Now set:
- Branch: the branch to deploy, for example
mainfor production - Build pack: Select Dockerfile here. Coolify preselects it automatically if it detects a Dockerfile in the repository. Without a Dockerfile, the default here is Railpack.
- Base directory: the directory the build runs from. By default, this is
/, i.e. the root directory of the repository. That's fine if your Dockerfile is in the root, as in section 2.
7.3 General settings
After that, the overview of your new resource opens. Here you can change the name of the application and manage the domains it should be available on under Public access. More on that in section 8.

Also make sure that 8080 is set under Exposed ports. That's the port NGINX listens on in the image.
Optionally, you can also change the container name and define commands to run before or after the deployment. You don't need these for the usual Laravel commands like migrations in this setup, because the image takes care of them automatically (see section 2).
7.4 Environment variables
Open Environment Variables in the sidebar. If you already have a complete .env, switch to the Developer View and paste the entire content there. Coolify then takes over the entries individually, so you can also edit them one by one later.

At a minimum, you should check these values:
APP_ENV=production
APP_DEBUG=false
APP_KEY=base64:...
APP_URL=https://example.com
Add the database and Redis values from section 6.
Tip: You can generate a new
APP_KEYlocally withphp artisan key:generate --show. Keep it once it's set. A new key invalidates encrypted data and existing sessions.
By default, every variable is available both during the build (Available During Build) and at runtime (Available in the Container). This matters for variables the frontend already needs during the build, such as all VITE_* values. So keep this option enabled for those variables.
7.5 Setting up persistent storage
Containers are recreated on every deployment. Anything the application stores inside the container at runtime would be gone afterwards, such as uploaded images and documents or the logs. To prevent this, we create volumes for them.
- Open Persistent Storage in the sidebar.
- Click Add Mount and select Volume Mount.
- Enter a name for the volume and the destination path inside the container.

I create two volumes for this:
| Purpose | Destination path |
|---|---|
| Uploaded files | /var/www/html/storage/app |
| Logs | /var/www/html/storage/logs |
8. Adding a domain
Coolify automatically assigns a URL to every new application, but it's only a placeholder. To make your application available under your own domain, you add it yourself.
8.1 Creating the domain
In the overview of your application, click the existing entry under Public access. Coolify then takes you to the domain management. Alternatively, you can find all domains under Domains in the sidebar.
Click Add Domain and enter:
- Protocol: usually
https - Domain: your domain, for example
example.com - Port: the port inside the container, so
8080for the Laravel application - Path: optional, if the application should only be available under a specific path

For Reverb, create a separate domain or subdomain the same way, for example ws.example.com, with port 8000.
Reverb variables: For your application and the frontend to reach Reverb through this domain, also add the public address to your environment variables, for example
REVERB_HOST=ws.example.com,REVERB_PORT=443andREVERB_SCHEME=https, along with the matchingVITE_REVERB_*values.
8.2 Setting the DNS records
To point the domain to your server, create two records with your domain provider:
| Type | Value |
|---|---|
A |
your server's IPv4 address |
AAAA |
your server's IPv6 address |
For Reverb, you need the same records for the subdomain as well.
8.3 Checking the DNS
Once the records are set, you can fetch the DNS again in Coolify from the domain's actions. As soon as the records point to your server, the green DNS matches status appears.

Tip: Depending on your provider, new DNS records can take anywhere from a few minutes to a few hours to propagate. If the status isn't green yet, wait a bit and check again.
9. Troubleshooting / debugging
9.1 The site shows a 503 error
This was the most common problem for me. When you open the site, you get a 503 Service Unavailable. That's confusing at first, because the error doesn't come from Laravel but from Traefik, Coolify's proxy.
The actual cause is almost always in the container: it isn't healthy. At first glance, it looks like it has started. In reality, it keeps restarting and is marked as unhealthy. As long as that's the case, Coolify doesn't create a route to this container in Traefik, and Traefik responds with a 503.
How to find the cause: Open your application's Logs in Coolify, specifically the runtime logs. There you'll see why the startup fails. Typical causes are:
- Database or Redis not reachable: Check the host, username and password in your environment variables. The host in particular is a common source of errors, see section 6.
- Wrong port: Check that
8080is set both under Exposed ports and on the domain, see sections 7.3 and 8.1.
Once the error is fixed and the container shows as healthy, the site is reachable again.
9.2 The site doesn't get a TLS certificate
If your domain doesn't get a valid certificate, it's often for the same reason as above: if the container isn't healthy, there's no route to it in Traefik, and the certificate can't be issued. So check the container status and the logs first, as described in 9.1.
The DNS records also need to be correct. The certificate can only be issued once Coolify shows DNS matches, see section 8.3.
9.3 GitLab doesn't start a deployment on push
With GitLab, the webhook for automatic deployments isn't created automatically, unlike with GitHub. In GitLab, check under Settings → Webhooks in your repository whether the webhook from Coolify exists. Section 4.4 explains how to create it.
If the webhook exists but nothing happens, look at the webhook's recent events in GitLab. There you can see whether GitLab sent the request at all and what Coolify responded.
I've gone through these steps myself on several projects, and not everything worked on the first try. If you get stuck somewhere in your setup or would rather have someone handle it for you, feel free to get in touch. I help with deployments using Coolify and Docker, from the initial setup to troubleshooting.